ENTER-PSSESSION fails, client not trusted

To enable remote PowerShell session on a client, the client must be trusted.

You might get a similar error message thrown, when using enter-pssession COMPUTER

PowerShellError

The easiest way to get a computer trusted is:

  1. Enable Trused Hosts group policy for Windows Remote Management (WinRM) using gpedit.
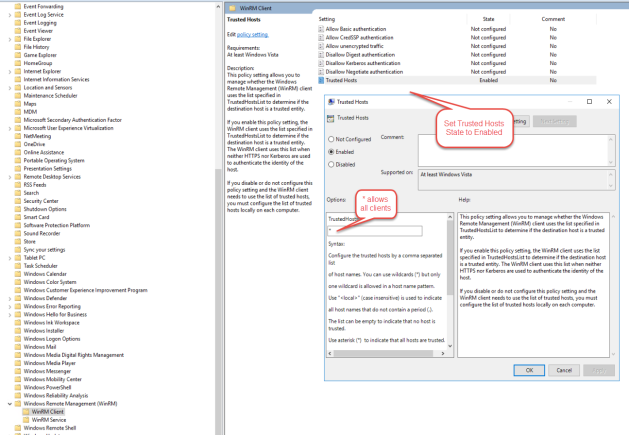
    1. Open gpedit.msc and navigate to: Computer Configuration\Administrative Templates\Windows Components\Windows Remote Management (WinRM)\WinRM Client
    2. Set the  Trusted Hosts setting to enabled
    3. Add the IP of the client machine to the TrustedHostsList value, or use * (Asterix) to enable all clients

TrustedHosts

Run a gpupdate /force to reload the group policies. After that you should be able to start a remote session with the client.

Default proxy settings in .Net configuration files

In environments that provide access to the internet through a proxy .Net Assemblies might fail to access the services located on the internet. An easy way to overcome this is to configure the defaultProxy element  in the .Net configuration file for the assembly.

<configuration>
  <system.net>
    <defaultProxy>
      <proxy usesystemdefault="true"
        proxyaddress="http://192.168.1.10:3128"
        bypassonlocal="true" />
      <bypasslist>
        <add address="[a-z]+\.contoso\.com" />
      </bypasslist>
    </defaultProxy>
  </system.net>
</configuration>

The defaultProxy configuration element accepts an address, credentials an optional bypass list.

The configuration can also be inherited by .Net assemblies providing a COM interface if the defaultProxy is configured in the caller’s configuration file.

Passing MSI options through InstallShield setup files

Often MSI installers are wrapped in a boot strap self extracting executable, like InstallShield does it with a setup.exe.

/v

Passing command line options to the wrapped installer through msiexec.exe is straight forward and can be done on the command line by using the /v option. For InstallShield setup executables the call might look like in this example:

setup.exe /v"MSI_PARAM1=0 MSI_PARAM2=MyStringValue"

Note: MSI parameters need to be upper case, otherwise the installer will not find the parameter value in the session.

MSI log

Forcing msiexec to write a log file can be done again by passing the right option to the /v option of the setup executable.

setup.exe /v”MSI_PARAM1=0 MSI_PARAM2=MyStringValue” /v"/l*v c:\test.log"

Silent install
Forcing msiexec to perform a silent or unattended installation is again done by passing the command with the /v option.

setup.exe /v”MSI_PARAM1=0 MSI_PARAM2=MyStringValue" /v"/l*v c:\test.log" /s /v"/qr"

Converting Linux VMWare VM using MVMC 3.0 PowerShell cmdlets

Converting VMs from VMWare to Hyper-V

The most easiest way to convert a VMWare VM is to use Microsoft Virtual Machine Converter 3.0. It comes in two ways, UI and PowerShell Cmdlets. The latter offers more flexibility, especially when the conversion process needs to be automated. Using MVMC you can either just convert a VM or convert and upload directly into Microsoft Azure.

Enable MVMC PowerShell module

1) cd into C:\Program Files\Microsoft Virtual Machine Converter
2) import-module .\MvmcCmdlet.psd1

This example converts a Linux VMWare VM into a Hyper-V VM using a PowerShell ComdLet

ConvertTo-MvmcVirtualHardDisk -DestinationLiteralPath "c:\temp\debian" -SourceLiteralPath "C:\VMs\Debian\disk1.vmdk" -VhdFormat "Vhd" -VhdType FixedHardDisk

Note: In the example I selected the older Vhd format and FixedHardDisk just because these settings are required when importing to Azure. For simple Hyper-V usage VHDX and Dynamic disk size are also possible certainly.

Now you can just create a new VM in Hyper-V Manager and point to the VHD(x) and the VM is available.

SNAGHTML4976a298

image

Uploading a converted VM into Microsoft Azure

Uploading into Azure means basically to upload the VHD into blob storage which then is taken as a base image you point to when creating a new VM. The easiest way to upload a VHD into a blob store is to use Azure CLI.

A command to create an image of the Linux VHD I used earlier looks like this:

azure vm image create DebianImage –blob-url {blobstoreName}/{imageName} –os Linux "c:\temp\debian\disk1.vhd"

With a Windows Server VHD it’s of course much more convenient and can be done from the MVMC UI directly.

Passing arguments to a Windows service installer class using in installutil

Passing parameters to an implementation of the Installer class of a Windows Service executable when installed by the installutil command line tool is pretty easy.

Simply add each parameter and value to the command line, like:

installutil.exe /param1=val1 /param2=val2 serviceexecutable.exe

Note: The parameter arguments needs to be in front of the executable. Otherwise the values will not be passed to the Installer class context.

The installer class implementation can access the arguments conveniently by the context.parameters collection.

image

Restoring a bacpac database backup in SQL Server

SQL database backup in Windows Azure has become super easy. All you need is a database hosted in Azure and a storage account. You can easily configure backup exports on a daily basis and define how long backups should be accessible. But how to restore such a bacpac backup to you on-prem SQL Server?

In Object Explorer select Databases from the Object tree. Choose Import Data-tier-Application and point to the *.bacpac file you downloaded from Azure earlier.

SNAGHTML50dc70

The wizard is mostly self-explanatory, for instance you can change the database name under which the bacpac package should be restored.

Could not find a base address that matches scheme net.pipe for the endpoint with binding NetNamedPipeBinding – WAS and IIS hosting

In most of the cases the error is indicating a missing host/base address section in the config file of the server.

So, simply add a host section to the services section and the define base addresses for http and net pipe like here:

<services>
   <service name="xxxx">
       <host>
           <baseAddresses>
               <add baseAddress="http://localhost:8000/MyService" />
               <add baseAddress="net.tcp://localhost:8100/MyService" />
               <add baseAddress="net.pipe://localhost/" />

But, you can also host a service that is only providing net pipes binding in IIS and benefit from the Windows Process Activation Service (WAS). Using WAS you let IIS control your service and IIS ensures that the service is running and restarted if necessary, all things you need to address in self hosting.

In the case of WAS services you can spare the above, endpoint protocol bindings are in fact defined in IIS and the subject’s exception message is indicating that the net.pipe protocol is not enabled in in the advanced settings of the IIS application. Most probably only the http protocol is enabled, which is the default. Just add net.pipe to the comma separated list and try to browse the service.

SNAGHTML31f444

Setup Azure Files for IIS

To setup a share in Azure Files straight forward, using a few lines of PowerShell makes it easy.

Assuming you applied to the Azure Files Preview program and received the notification email by the azure team that Azure Files is available for your subscription.

Azure Files will be available for each storage account you create after Azure Files became available.

image

After you’ve created a new storage account, Azure Files is configured and pops up in the service list in the storage dashboard in the Azure portal.

Create a share in PowerShell

It needs two steps to create a share in PowerShell. First you need to setup a storage account credentials object. Then take the credentials object and the name of the share to call the New-AzureStorageShare cmdlet.

param (
    [string]$StorageAccount="",
    [string]$StorageKey="",
    [string]$ShareName=""
)
$ctx = New-AzureStorageContext -StorageAccountName $StorageAccount -StorageAccountKey $StorageKey
$share = New-AzureStorageShare $shareName -Context $ctx

To run the script above you need your storage account, the access key, you can find in the keys section of the storage dashboard in the Azure portal, and the name of the share you want to create.

If that’s done your Azure files share is generally available. The easiest way to access the share is to run a net use command from the command line, like:

net use z: \\<account name>.file.core.windows.net\<share name> /u:<account name> <account key>

The command above maps the UNC path \\<account name>.file.core.windows.net\<share name> to a drive named z:. File and directories will be available from this moment on by z:\<share name>

Unfortunately, it’s not possible to access files like this in IIS. Instead, you will receive errors like Authentication failure, Web.Config not accessible or simply a page not found error.

Also, you can’t configure ACLs for the share, what makes it difficult to allow the app pool identity to access the shared directories.

How to prepare the IIS application pool

Let’s say we have a web application that first needs to create images on the share. Also clients should be able to request those images by http.

1) First create a new local system user using the computer management snap-in. Assign storage account name and storage key as password to the new user.

2) Now make the new user the app pool identity of the application pool in IIS.

3) Setup a virtual directory that points to the UNC path of the shared directory.

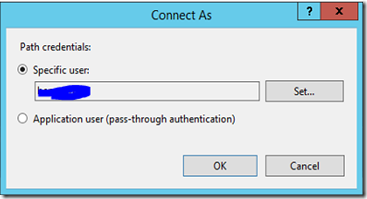
4) Open the Edit Virtual Directory dialog (select Basic Settings… in right pane), click on Connect as.. and select the new user to connect.

image

5) In the Connect as… dialog configure the specific user and take the same user credentials as for application pool. (I tried the Application user (pass-though authentication) option, but was unlucky to access the files in the browser).
image

Now, you should be able to read/write files to the share from the application and browser clients should also be able to stream resources from the share.

Powershell DSC

In an automated deployment world, window clicking to install Windows features and roles is first of all boring, much too slow, highly error-prone and nineteen nineties.

My team was searching for a solution that helps us to describe and create a specific state of configuration of the operating system of a virtual machine, and that automatically and unattended.

Powershell Desired State Configuration makes it possible to define the wanted state in an easy to use abstract language. Powershell DSC “compiles” the configuration script at runtime on the target machine and applies the necessary actions. Actually, it’s not a compilation, more a transformation process from a domain specific meta language into real Powershell. Each step in the configuration script can be executed atomically, but dependencies are honored and can be configured. The Powershell DSC runtime deals with reboots and continues to process the script after a reboot.

Here’s an example, that configures a desired state by installing different features:

1 configuration InstallMir 2 { 3 node ("localhost") 4 { 5 WindowsFeature IIS 6 { 7 Ensure = "Present" 8 Name = "Web-Server" 9 } 10 #Install NET-Framework-45-Core 11 WindowsFeature NET45 12 { 13 Ensure = “Present” 14 Name = “NET-Framework-45-Core” 15 } 16 17 #Install ASP.NET 4.5 18 WindowsFeature ASP 19 { 20 Ensure = “Present” 21 Name = “Web-Asp-Net45” 22 } 23 24 #Install MSMQ 25 WindowsFeature MessageQueueFeature 26 { 27 Ensure = “Present” 28 Name = “MSMQ” 29 } 30 31 } 32 }


Powershell DSC for developers

Powershell Desired State Configuration also allows a development team to describe easily the configuration the application need on the host system. The domain specific language Powershell DSC is providing makes it easy for developers, who are often not Powershell experts to describe the wanted state in a precise manner.

Powershell DSC for DevOps / QA

From a DevOps QA point of view starting each new deploy from scratch with a reliable and deterministic state is heaven. Poweshell DSC closed the gap between a new Windows image and the installation of the software. All the prerequisites that need to be preinstalled can be described and installed using Powershell DSC.

It also helps in communication with other IT operations teams, because the required state of configuration can be communicated precisely. In fact, most is said by sending the Powershell DSC script.

Powershell DSC and Microsoft Azure

Microsoft Azure provides a VM extension that can be installed when creating the virtual machine. Through that extension Powershell DSC scripts can be executed easily. The Powershell DSC script needs to be uploaded to a Azure storage account first to make the script available for the target machine.

Here a script that uploads a Powershell DSC script into the Azure storage. The $ConfigurationPath variable contains the full path to the PowerShellDSC *.ps1 script on the local machine.

1 $StorageContext = New-AzureStorageContext -StorageAccountName $StorageAccount -StorageAccountKey $StorageKey 2 Publish-AzureVMDscConfiguration -ConfigurationPath $ConfigurationPath -ContainerName $StorageContainer -StorageContext $StorageContext -Force 3

The next script executes the script on the target machine. First it creates a storage credentials object, then it loads the reference to the target VM and calls Set-AzureVMDscExtension to run the earlier uploaded DSC script. The extension is going to be installed if not already.

1 $StorageContext = New-AzureStorageContext -StorageAccountName $StorageAccount -StorageAccountKey $StorageKey 2 $vm = Get-AzureVM -ServiceName $mySvc -Name $vmName 3 4 Set-AzureVMDscExtension -VM $vm -ConfigurationArchive $ConfigZipFilename -ConfigurationName $ConfigName -Verbose -StorageContext $StorageContext -ContainerName $StorageContainer -Force | Update-AzureVM 5

Powershell DSC on Windows

Powershell DSC is onboard Windows 2012 R2 and Windows 8.1. Remotely executed on Windows 2012 R2 in Azure makes fun the most.

Using Microsoft Azure File Service

Almost a year ago Microsoft introduced a file share technology called the Microsoft Azure File Service. Although it’s still in preview and you need to apply to it from within the Azure portal it offers the most convenient (and reliable) way to share directories and files between virtual machines in Azure. The Azure File Service adds powerful flexibility to the IaaS platform, especially when your application is highly scalable and needs to process and share a lot of files in a reliable manner.

Setup

To setup a share you need to activate the Azure File Service. The best way to do that is to use the new Azure portal and sign up for the Azure File Service preview program. This can be done in the Azure Storage area. I received the sign up approval a few minutes later and the File Service was unlocked. That enabled me to select a file endpoint when I create a new storage.

Once the new file storage account is configured it’s available for VMs, worker- and web roles, as long as there located in the same region where the storage account is hosted.

To access Azure Files from a virtual machine run the following command in a command prompt on the box:

net use z: \\<account name>.file.core.windows.net\<share name> /u:<account name> <account key>

That’s it. Now the user can access files and folders on the share drive. Account-, name and key and share name is available in the portal.

Allowing IIS to access Azure Files

I needed to grant the IIS application pool user as well as the IUSR access to the share. That was not that easy, because you can’t configure the ACL directly for the share.

I could create a Windows user and gave it the storage account name and password, though. I assigned those credentials to the app pool identity and created a virtual directory in IIS, to which I used the same Windows user again to connect. I couldn’t access files using the drive letter path, but it worked pretty well using the UNC path \\<account name>.file.core.windows.net\<share name> instead.